Air Battery
Make a battery that works with air and saltwater
This science project experiment is a simplified version of the air battery project available at ScienceProject.com. Pictures and excerpts of information are published here with permission. |
| This may seem impossible. I could not believe it myself the first time that I heard about it. It almost sounds like a magic trick. Finally, I decided to test it anyway. I tried different concentrations of salt water, different temperatures, and different electrodes and had no success. It took me a few months thinking about it until I solved the problem in my mind and decided to repeat my tests again. This time everything worked fine and I was able to make enough electricity to light up a small light bulb. |  |
I don’t know if this method of producing electricity is economical and cost effective. What I know is that it is worth to try. If with one cup of salt water and some metals I was able to light up a small light bulb, maybe you can light up the entire building by a tank of salt water and a few hundred pounds of scrap metal.
No mater what is the results, I am proud that I can make an emergency battery for myself if I need it.
It took me a long time to make the first working battery using the salt water; however, you don’t have to waste that much time. I have combined the results of all my experiments and made a recipe for success. Just follow the instructions and you will get results in the first try.
| Actually there are many different combinations of many different materials that can produce some electricity. Experimenting with saltwater and air is suggested for the younger students because these are relatively safer material. |
This is the minimum list of material you need for your experiment.
|
|
- A wooden board to mount the miniature base (light holder)
- Plastic container about 4" x 4" x 4"
- Hydrogen Peroxide
| What is a good title for my project?You can call it "Air battery", "Salt water battery", "electricity from air" or "electricity from the salt water". |
- Remove the plastic insulation of about one inch from both ends of the wires.
- Loosen the screw on both contacts of the bulb holder. Place one end of the red wire under one screw, make a loop and then tighten the screw. Place one end of the black wire under the other screw, make a loop and then tighten the screw.
- Pass the open end of the red wire through the arm of the red alligator clip and secure it under the screw.
- Pass the open end of the black wire through the arm of the black alligator clip and secure it under the screw.
- Screw the light bulb on the miniature base.
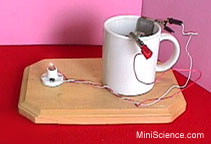
- Connect the red alligator clip to the iron electrode and secure it on one side of the plastic container or the cup.
- Connect the black alligator clip to the magnesium electrode and secure it on the opposite side of the container. (You may need to hold them by hand or use a small tape to hold them in place on the side of the container.
- In another pitcher, prepare some strong, warm salt water. Add enough salt so at the end some salt will be left at the bottom of the pitcher.
- Transfer the salt water from the pitcher to the container.
- At this time, if all the connections are secure and the electrodes are large enough, you should get a light.
|  |
You may notice that you will get more light if you stir the solution or if you remove the iron electrode and insert it back again. Such actions provide oxygen to the surface of the iron.
Note: Steel is about 98% iron.
| The oxygen in the air may not be enough for your demonstration and you may get a dim light. In this case you may add some oxygen (in the form of hydrogen peroxide) to the salt water. That should immediately increase the light. |  |
| A cup is relatively small. If you have access to a larger container, you will get a better result. In a larger container, it is easier to secure the electrodes in two opposite sides so they will not touch each other. |  |
| Where to buy the materials?The main components of this project are available as a set in MiniScience.com online store andKidsLoveKits.com. This set will only include the essential components. You must have a plastic container, a wooden board, some iron and some hydrogen peroxide to complete your material. This set includes 2 Magnesium electrodes, screws, light bulb, light base and insulated wire with alligator clips on both ends. Part# AIRBAT |  |
| The electricity produced in this way may be used to light up a light bulb, an LED or run a low voltage electric motor. |
No comments:
Post a Comment